MONITORING INTERNET COMMUNICATIONS
FREQUENTLY ASKED QUESTIONS
Maintaining internet communications to the monitoring system is the responsibility of the customer post-installation. Once we have commissioned the system, most internet connections issues fall in the field of an IT specialist. As this is not our specialty (and beyond the scope of our installation contract), Artisan Electric Inc. does not provide support services for internet communications issues.
Please read the FAQ below for troubleshooting suggestions, then reach out to an IT specialist if you need further assistance. We are hoping to compile a list of companies who can help with this, so if you find a good one please feel free to share their name with us!
How are monitoring systems hooked up to the internet?
EGauge: Via 1 HomePlug device near the internet router.
Tigo: Either 2 HomePlug devices or 1 Wi-Fi extender. Rare: Hardwired.
AP Systems / Bluefrog: Either 2 HomePlug devices or 1 Wi-Fi extender. Rare: Hardwired.
SunPower: Either 2 HomePlug devices or 1 Wi-Fi extender. Rare: Hardwired.
SolarEdge: Either 2 HomePlug devices or 1 Wi-Fi extender. Rare: Hardwired.
EnPhase: Either 2 HomePlug devices or hardwired.
LG: Either 2 HomePlug devices or hardwired.
What is a HomePlug device?
HomePlugs (aka AV Powerline Adapters) are small 2″ by 3” white blocks that plug into a regular wall outlet, then have an ethernet cable running out of the bottom. Homeplugs are commonly used and can be found at most electronics stores. This is a 3rd party piece of equipment, which is not manufactured by solar companies.
Here are some examples of common HomePlug models:
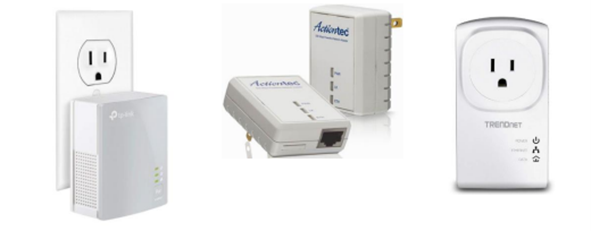
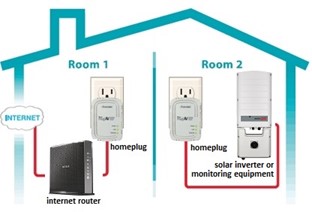
AV Powerline adapters send data through your home’s electrical wiring within the walls. Think of it as a bridge in cases where hardwiring a single LAN cable is not possible. One device will be located near your inverter or monitoring device. The other device will be located near your internet router or modem. Except with eGauge – there will only be one near your internet router. The eGauge device itself has HomePlug capability built-in, so a second HomePlug device is not needed.
I have eGauge Monitoring. The page says “Not Found” when I go to it. How can I troubleshoot?
The Not Found message means that the eGauge is no longer connected to the internet. Please follow these steps.
1. Please ensure your HomePlug’s LEDs are solid or flashing. If they are lit please proceed to step 2
If no LEDs are lit, try unplugging it from the wall and plugging it back in. If you still see no LEDs, then the HomePlug is dead and you’ll need to purchase a replacement. See “The lights are not working on my HomePlug(s). What do I do?” section below.
2. Please confirm you have a network (ethernet) cable from the HomePlug to your router or modem.
3. Please confirm the HomePlug is plugged directly into the wall outlet. HomePlug will not work if plugged into any surge protection devices.
4. Re-boot all three components involved. Unplug the HomePlug from the wall outlet, unplug your internet modem/router and turn the eGauge breaker (should be labeled in your electrical panel) off. Once they’re all off, wait a minute or two.
5. Power your modem or router and HomePlug on first, and eGauge breaker last.
6. That should re-sync them and allow the devices to communicate. It can take about five minutes for the eGauge to come back online.
I have HomePlugs. How can I troubleshoot?
1.Please ensure your HomePlug’s LEDs are solid or flashing. If they are lit please proceed to step 2
- If no LEDs are lit, try unplugging it from the wall and plugging it back in. If you still see no LEDs, then the HomePlug is dead and you’ll need to purchase a replacement. See “The lights are not working on my HomePlug(s). What do I do?” section below.
2. Please confirm you have a network (ethernet) cable from the HomePlug to your router or modem.
3. Please confirm the HomePlug is plugged directly into the wall outlet. HomePlug will not work if plugged into any surge protection devices.
4. Unplug both HomePlug from wall outlets, then plug back into power cycle the devices.
The lights are not working on my HomePlug(s). What do I do?
If the lights are not on, try plugging it into another outlet. This is to test whether it’s a bad outlet or a bad HomePlug. If lights still do not turn on, that means it is dead and you will need a new one. Please purchase a new HomePlug. You can buy them at electronics stores such as Best Buy. Some department stores such as Target and Fred Meyers also carry them. Here are some Amazon links:
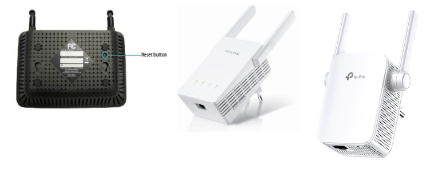
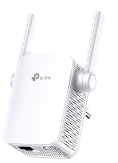
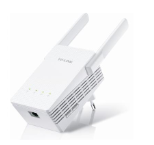
What is a Wi-Fi extender?
Some Wi-Fi extenders look similar to a HomePlug, but it has antennae. There will be one plugged into a wall outlet near the solar inverter or monitoring equipment, with an ethernet cord connecting the two.
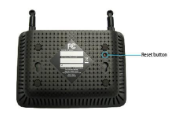
I have a Wi-Fi Extender. How can I troubleshoot?
First, please look at the sticker on the back or side to find the model number. Then, follow the instructions in the corresponding manual to reset the Wi-Fi extender. If your Wi-Fi password or network name has changed since the solar was installed, this is likely the reason it is no longer connecting. See below for some commonly installed Wi-Fi Extenders and manuals. If you do not see your exact model, you can Google the model number to find a manual.
Linksys RE6500 AC1200 Wi-Fi Range Extender
eLinksys RE6500 AC1200 Wi-Fi Range Extenders
TP-Link RE305AC1200Wi-Fi Range Extender
TP-Link RE210 AC750 Wi-Fi Range Extender
TP-Link RE210 AC750 Wi-Fi Range Extender
TP-Link RE305 AC1200 Wi-Fi Range Extender
I have the LG EnerVu monitoring. How can I troubleshoot? (I do not have a battery)
If you do not have a battery follow these instructions:
1.Power cycle your internet modem by unplugging it, waiting 30 seconds, and plugging it back in. Wait until the internet comes back before moving on to step 2.
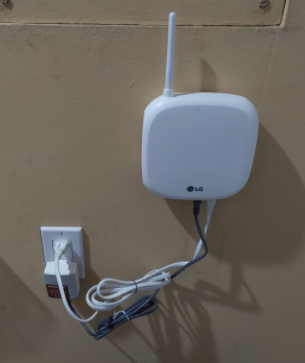
2. Unplug your LG EnerVu box from the wall, wait 30 seconds, then plug it back in. The LG EnerVu box looks like this and is usually located near your electrical panel:
3. Please ensure your HomePlug’s LEDs are solid or flashing. If they are lit please proceed to step 2.
-If no LEDs are lit, try unplugging it from the wall and plugging it back in. If you still see no LEDs, then the HomePlug is dead and you’ll need to purchase a replacement. See “The lights are not working on my HomePlug(s). What do I do?” section above.
4. Please confirm you have a network (ethernet) cable from the HomePlug to your router or modem
5. Please confirm the HomePlug is plugged directly into the wall outlet. HomePlug(s) will not work if plugged into any surge protection devices.
6. Unplug both HomePlug from wall outlets, then plug back into power cycle the devices.
I have the LG EnerVu monitoring. How can I troubleshoot? (I do have a battery)
If you have a battery follow these instructions:
1.Power cycle your internet modem by unplugging it, waiting 30 seconds, and plugging it back in. Wait until the internet comes back before moving on to step 2.
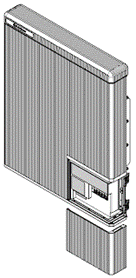
2. Power cycle your LG ESS Inverter. The inverter has an integrated communications device that may need to be reset.
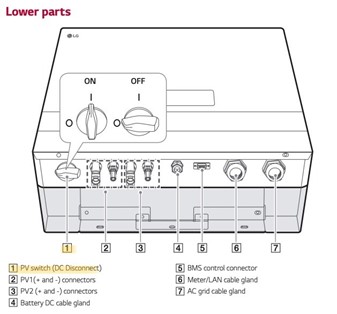
ESS Inverter DC Disconnect:
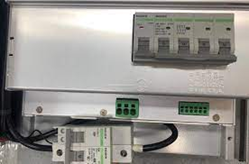
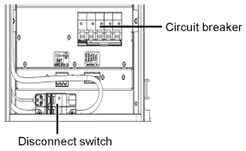
LG Chem battery auxiliary disconnect switch and circuit breaker:
Inverter turn-off procedure:
-
- Turn off the DC disconnect (turn to “OFF” position). This is the highlighted knob in the diagram above.
- Turn OFF the circuit breaker and disconnect switch on the Battery.
- Turn OFF the AC disconnect.
- Turn OFF the 2-pole breaker in the home electrical panel.
Inverter turn-on procedure:
-
-
- Turn ON the 2-pole breaker in the home electrical panel.
- Turn ON the AC disconnect.
- Turn ON the circuit breaker and disconnect switch on the Battery.
- Turn ON the DC disconnect (turn to “ON” position). This is the highlighted knob in the diagram above.
- Check for inverter initialization (four LED indicators are illuminated with Green).
-
3 . Please ensure your HomePlug’s LEDs are solid or flashing. If they are lit please proceed to step 4
-If no LEDs are lit, try unplugging it from the wall and plugging it back in. If you still see no LEDs, then the HomePlug is dead and you’ll need to purchase a replacement. See “The lights are not working on my HomePlug(s). What do I do?” section above.
4. Please confirm you have a network (ethernet) cable from the HomePlug to your router or modem
5. Please confirm the HomePlug is plugged directly into the wall outlet. HomePlugs will not work if plugged into any surge protection devices.
6. Unplug both HomePlug from wall outlets, then plug back into power cycle the devices.
I’m still having issues, how do I get help?
We recommend using Google Maps or Yelp to find an IT company in your area that can assess your specific needs.